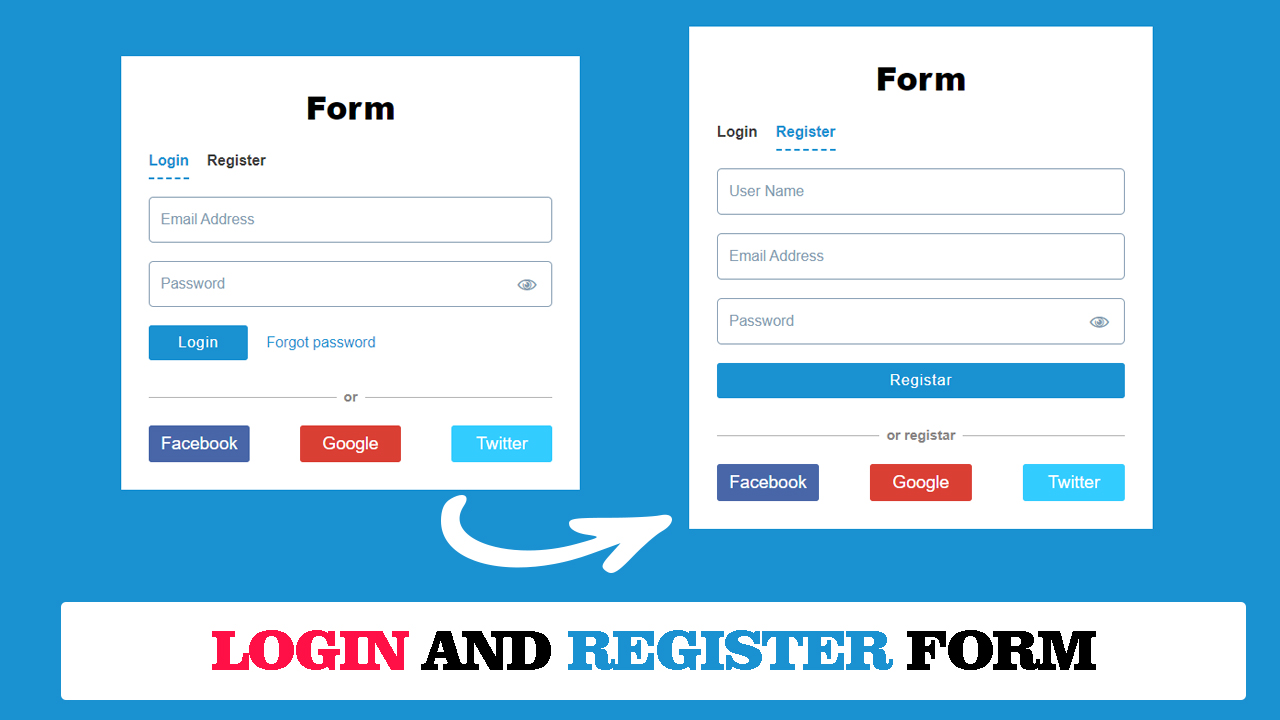
Hello readers, you will read in this blog how to create a login and register form. You will learn to make this login and register form under the same box. Which looks like a beautiful.
By clicking on this button, we are opening the page of the form. Which you will learn to make so easily. We have designed this form with the help of html css and javascript.
We know that when we go to a website, we see that there is a login and register page in that website. You can use this form on your website.
If you want to register and login for more, then you can read and create by clicking on the link given below.
- Responsive Registration Form
- Responsive Modal Login Form
- Slider Sign In & Sign Up Form
- Login Form
- registration form
You must have learned how to register by clicking on the link above and register for it.
Now we know how this login and register for code has been written.
First we have taken a <div> tag whose class name is class="form-wrapper" inside it we have taken another <div> tag whose name is class="form-container " .
Now we have put <h1> tag inside this and its class name is class="heading" and inside which form text is written.
Under this <h1> tag we have taken <ul> tag and inside this tag we have two < li> tag and <li> have a <a> tag. For which we have written login and register text.
We have taken <div> tag under <ul> tag and class name of this tag is class="form-tab" is | And inside this tag another <div> tag is taken. Whose class name class="show" and id name id ="loginForm" And inside this <div > tag we have taken <form> tag. And inside this tag we have taken <div > tag. Whose class name is class="input-box". and inside it we took <input> tag. And that's what we've tagged on.
You might like this:
- Responsive DropDown Navigation Menu and Sub Menu
- Responsive Navbar with Social Media share icons
- 3D registration form design
- Animated Social Media Button
- google search app design
If you go to this login and register form to watch the video tutorial. So you can watch the full video by clicking on the video given below. Which you can easily understand the code.
Video Tutorial of Login And Register Form
I hope by watching the video tutorial, you must have understood completely how this login and register form has been designed. And if you want to see the code of this form in your system, then you can copy the code given below and see it in your system.
HTML CODE FILE :
<!DOCTYPE html>
<html lang="en">
<head>
  <meta charset="UTF-8">
  <meta http-equiv="X-UA-Compatible" content="IE=edge">
  <meta name="viewport" content="width=device-width, initial-scale=1.0">
  <title>Login And Register form</title>
  <link rel="stylesheet" href="style.css">
</head>
<body>

  <div class="form-wrapper">
    <div class="form-container">
      <h1 class="heading">Form</h1>
      <ul class="nav-tab">
        <li><a href="#" id="loginbtn" class="btnlist active">Login</a></li>
        <li><a href="#" id="regbtn" class="btnlist">Register</a></li>
      </ul>

      <div class="form-tab">
        <div id="loginForm" class="show">
          <form action="">
            <div class="input-box">
              <input type="email" placeholder="Email Address">
            </div>

            <div class="input-box">
              <span class="view">👁</span>
              <input type="password" placeholder="Password">
            </div>

            <div class="btn-cont">
              <button class="submite-btn">Login</button>
              <a href="#" class="forget">Forgot password</a>
            </div>

            <div class="line">
              <span>or</span>
            </div>

            <ul class="flow-btn-cont">
              <li><a href="#" class="fa-btn">Facebook</a></li>
              <li><a href="#" class="goog-btn">Google</a></li>
              <li><a href="#" class="twit-btn">Twitter</a></li>
            </ul>
          </form>
        </div>
        <!-- ============================Registar====section=============== -->

        <div id="registar">
          <form action="">
            <div class="input-box">
              <input type="text" placeholder="User Name">
            </div>
            <div class="input-box">
              <input type="email" placeholder="Email Address">
            </div>

            <div class="input-box">
              <span class="view">👁</span>
              <input type="password" placeholder="Password">
            </div>

            <div class="btn-cont">
              <button class="submite-btn registar-btn">Registar</button>

            </div>

            <div class="line">
              <span>or registar</span>
            </div>

            <ul class="flow-btn-cont">
              <li><a href="#" class="fa-btn">Facebook</a></li>
              <li><a href="#" class="goog-btn">Google</a></li>
              <li><a href="#" class="twit-btn">Twitter</a></li>
            </ul>

          </form>
        </div>
      </div>
    </div>
  </div>
</body>
</html>
CSS CODE FILE :
  * {
  margin: 0;
  padding: 0;
  box-sizing: border-box;
  font-family: Arial, Helvetica, sans-serif;
}

.form-wrapper {
  background-color: #1A91D1;
  display: flex;
  flex-direction: column;
  align-items: center;
  justify-content: center;
  min-height: 100vh;
}

.form-container {
  background-color: #fff;
  min-width: 500px;
  padding: 30px;
}

.heading {
  text-align: center;
  font-size: 35px;
  font-weight: 800;
  word-spacing: 1px;
  margin-bottom: 25px;
}

.nav-tab {
  list-style: none;
  display: flex;
  flex-direction: row;
  gap: 20px;
  margin-bottom: 30px;
}

.nav-tab li .btnlist {
  text-decoration: none;
  color: #3b3b3b;
  padding-bottom: 10px;
  font-weight: 700;
}

.nav-tab li .btnlist.active {
  border-bottom: 2px dashed #1A91D1;
  color: #1A91D1;

}

form .input-box {
  position: relative;
  margin-bottom: 20px;
}

form .input-box input {
  width: 100%;
  height: 50px;
  line-height: 50px;
  padding-left: 12px;
  font-size: 16px;
  color: #829ab0;
  border: 1px solid #829ab0;
  border-radius: 5px;
  -webkit-border-radius: 5px;
  -moz-border-radius: 5px;
  -ms-border-radius: 5px;
  -o-border-radius: 5px;
}

form .input-box input::placeholder {
  color: #829ab0;
}

form .input-box input:focus {
  outline: none;
  border: 1px solid #1A91D1;
}

form .input-box .view {
  display: inline-block;
  position: absolute;
  right: 0;
  top: 0;
  color: #829ab0;
  bottom: 0;
  width: 40px;
  font-size: 25px;
  line-height: 50px;
  cursor: pointer;
}

.btn-cont {
  display: flex;
  flex-direction: row;
  flex-wrap: nowrap;
  gap: 20px;
  align-items: center;
}

.btn-cont .submite-btn {
  background-color: #1A91D1;
  color: #fff;
  border: none;
  padding: 10px 32px;
  font-size: 16px;
  font-weight: 400;
  letter-spacing: 1px;
  cursor: pointer;
  border-radius: 3px;
  -webkit-border-radius: 3px;
  -moz-border-radius: 3px;
  -ms-border-radius: 3px;
  -o-border-radius: 3px;
}

.forget {
  color: #1A91D1;
  text-decoration: none;
}

.forget:hover {
  text-decoration: underline;
}

.line {
  height: 1px;
  text-align: center;
  margin-top: 40px;
  background-color: #b0b0b0;
  margin-bottom: 30px;
}

.line span {
  background-color: #fff;
  padding: 8px;
  position: relative;
  top: -9px;
  font-size: 15px;
  font-weight: 600;
  color: #878484;
}

.flow-btn-cont {
  display: flex;
  flex-direction: row;
  flex-wrap: wrap;
  justify-content: space-between;
  list-style: none;
}

.flow-btn-cont li a {
  display: inline-block;
  width: 110px;
  height: 40px;
  line-height: 40px;
  text-align: center;
  text-decoration: none;
  font-size: 19px;
  color: #fff;
  border-radius: 3px;
  -webkit-border-radius: 3px;
  -moz-border-radius: 3px;
  -ms-border-radius: 3px;
  -o-border-radius: 3px;
}

.flow-btn-cont li a.fa-btn {
  background-color: #4866a8;
}

.flow-btn-cont li a.goog-btn {
  background-color: #da3f34;
}

.flow-btn-cont li a.twit-btn {
  background-color: #3cf;
}

.flow-btn-cont li a:hover {
  opacity: 0.9;
}

#loginForm,
#registar {
  display: none;
}

#registar .registar-btn {
  width: 100%;
}

#loginForm.show,
#registar.show {
  display: block;
}
JAVASCRIPT CODE FILE :
  const loginbtn =document.getElementById("loginbtn");
  const regisbtn =document.getElementById("regbtn");
  const loginShow=document.getElementById("loginForm");
  const regShow =document.getElementById("registar");

  loginbtn.addEventListener("click", ()=>{
    loginShow.classList.add("show");
    regShow.classList.remove("show");
    loginbtn.classList.toggle("active");
    regisbtn.classList.remove("active");
  });

  regisbtn.addEventListener("click",()=>{
    regShow.classList.add("show");
    loginShow.classList.remove("show");
    loginbtn.classList.remove("active");
    regisbtn.classList.add("active");
  })


Post a Comment